
10 DIY Fall Wreaths That Actually Look Like You Put in the Effort (No Fake “Pinterest Perfection” Here)
Every year when the first crisp breeze hits, I get this itch to make my house feel like a cozy autumn hug. And honestly? DIY fall wreaths are my secret weapon. They’re the easiest way to add warmth without dropping a fortune on store-bought décor that looks like it was mass-produced in a warehouse. Plus, my kids love helping,even if it means I end up with more glue on the floor than on the wreath.

I’ve messed up more wreaths than I care to admit (RIP, my first attempt with real pumpkins that rotted in 48 hours). But after years of trial and error, I’ve learned what actually works,and what’s just a Pinterest lie. Below are 10 real, doable fall wreath ideas that’ll make your front door (or mantel, or kitchen wall) look like you put in the effort. No fake “expert” fluff, just my honest tips, mistakes, and the tools I actually use.
Why DIY Fall Wreaths Are Worth the Mess
Let’s be real: Store-bought wreaths either look cheap or cost $80 for something you could make in an hour. DIY wreaths let you customize every detail,whether you want rustic charm, modern minimalism, or something that screams “I foraged this from my backyard like a pioneer.” Plus, they’re a great way to use up natural materials you already have lying around (looking at you, pinecones from last year’s “I’ll clean the yard this weekend” pile).
And here’s the best part: They don’t have to be perfect. My first wreath looked like a squirrel’s nest after a tornado. But now? I’ve got a system,and I’m sharing it with you so you don’t have to suffer through the same learning curve.
If you’re new to DIY, don’t stress. I’ve got five easy projects to build your confidence before tackling wreaths. And if you’re like me and love a good challenge, stick around,we’re about to get creative.
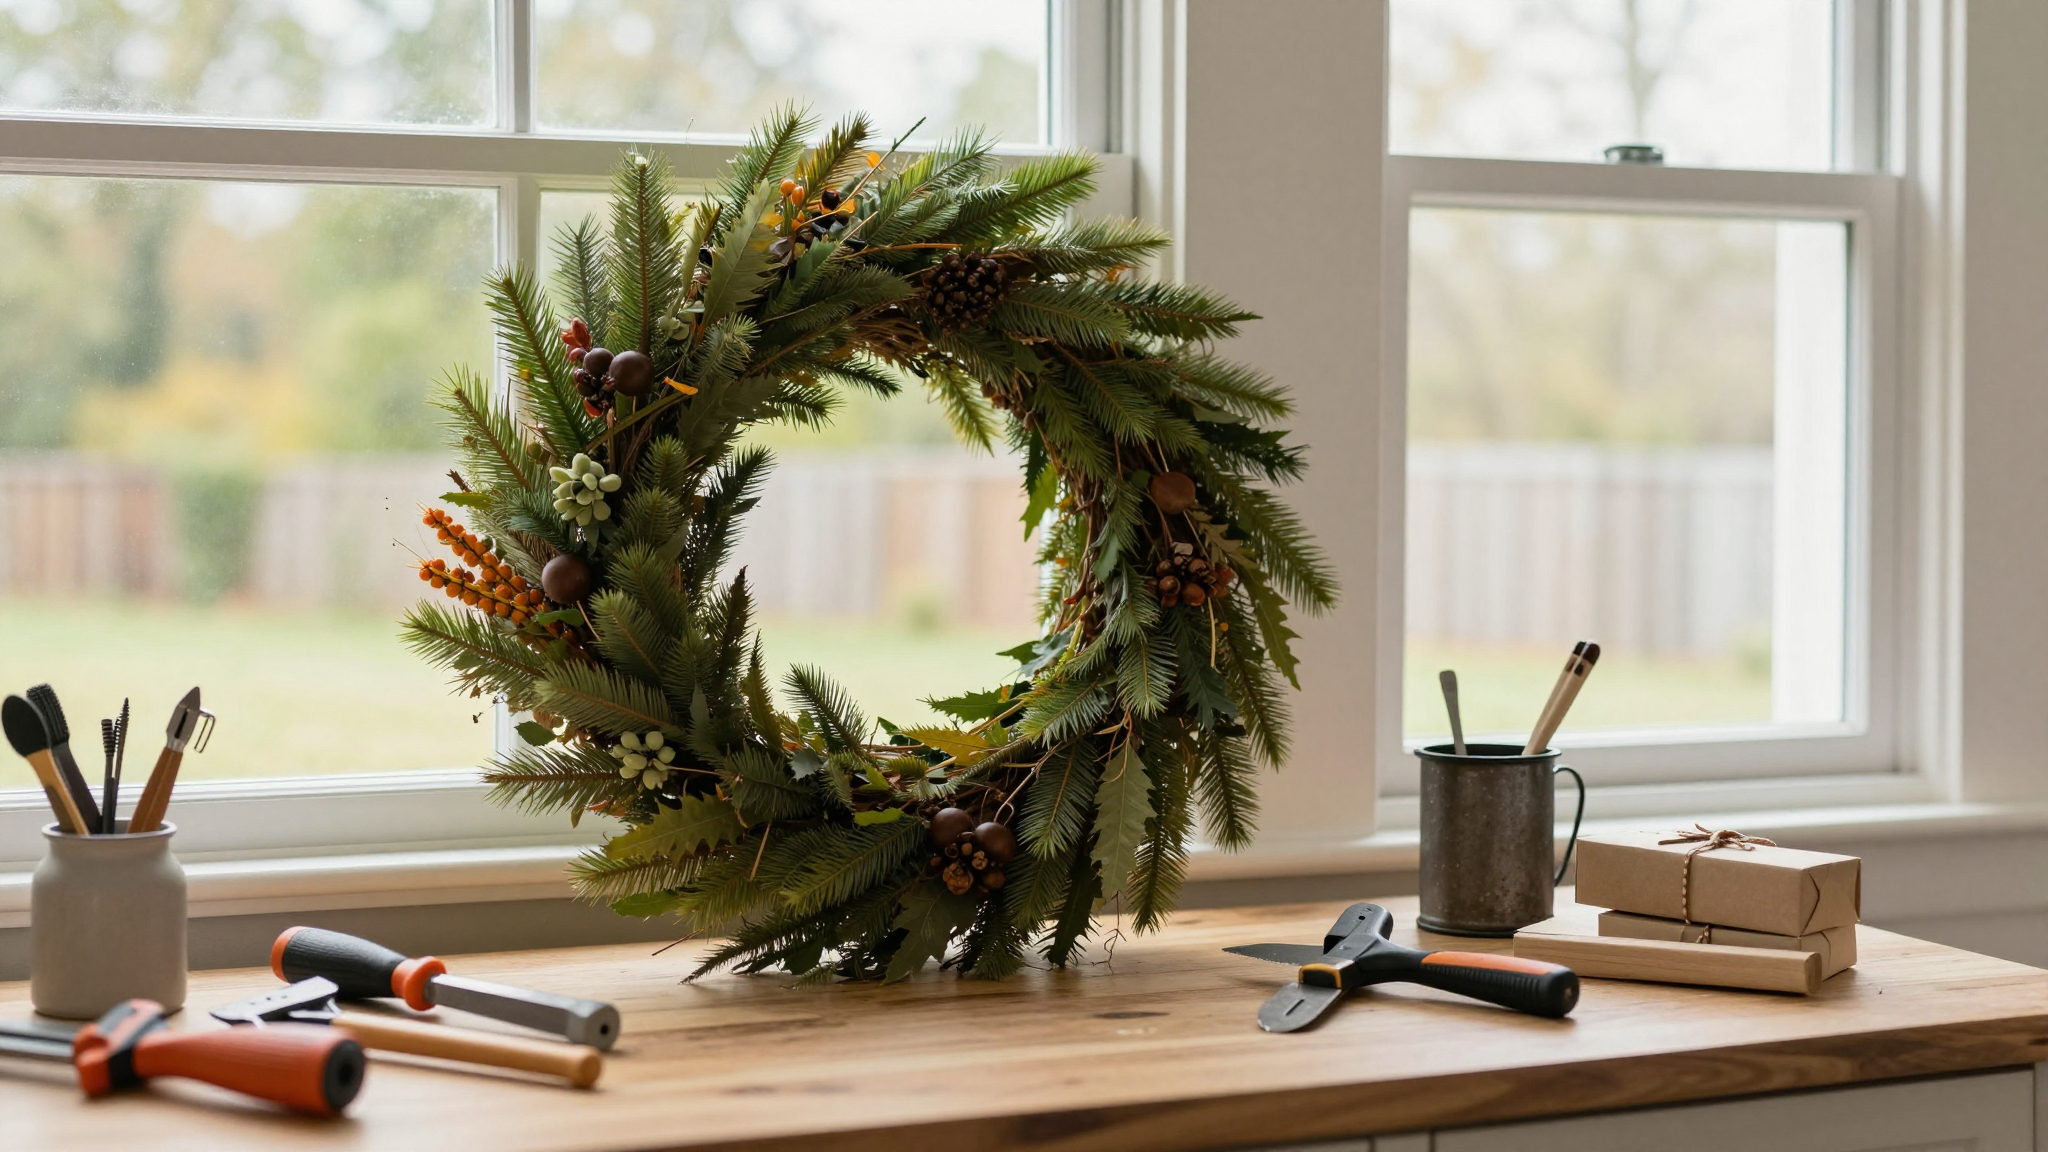
Tools and Materials You’ll Actually Need (No Fancy Stuff)
Before you start, grab these basics. I keep a DIY tool caddy in my garage with everything I need for wreaths, upcycling projects, and random craft emergencies. Trust me, it saves the “I have scissors but no glue” panic.
- Base: A wire or foam wreath frame (I swear by the 18-inch ones from Michaels,use their 40% off coupons!). Foam is easier for beginners, but wire gives a more natural look.
- Adhesive: A hot glue gun (my go-to for quick fixes) and floral tape (it’s stretchy and hides wires,game changer).
- Natural elements: Pinecones (collect them after a windy day,free decor!), twigs, oak leaves, and eucalyptus. Pro tip: Spray-paint pinecones gold or copper for a fancy touch without breaking the bank.
- Extras: Ribbons (burlap or satin), faux pumpkins (check the dollar store!), berries, and dried flowers. I love babies’ breath and lavender for texture and scent.
- Tools: Scissors, wire cutters (for trimming frames), and a spray bottle of water (to mist foam bases so glue sticks better).
Oh, and wear an apron. Or don’t. I learned that lesson the hard way when I got hot glue on my favorite sweater. (It’s now my “crafting sweater,” and I wear it with pride.)
Classic Autumn Foliage Wreath: The “I Tried” Look (That Actually Works)
This is the wreath I make when I want my door to scream, “Welcome to my cozy autumn home!” It’s simple, natural, and forgiving if you’re not a craft perfectionist (which, let’s be honest, most of us aren’t).
Start with a wire or foam wreath base. I like wire because it’s lighter, but foam is easier to attach things to if you’re a beginner. Then, gather your foliage:
- Oak leaves (real or fake,no judgment)
- Pinecones (the bigger, the better for texture)
- Twigs (cut them into 3–4 inch pieces for easier attaching)
- Dried flowers or berries (I used hypericum berries last year,they look like tiny red pom-poms!)
Here’s my pro tip from experience: If you’re using real leaves, spray them with hairspray (yes, really) to keep them from crumbling. I learned this the hard way when my first wreath turned into confetti after two days of rain.
Arrange everything in clusters,don’t space it out evenly like a robot. Nature isn’t perfect, and neither should your wreath be. Use floral tape to secure stems, and hot glue for anything heavy (like those pinecones). Finish with a burlap ribbon for a rustic touch.
Where to hang it? My front door is the obvious choice, but I’ve also hung them on my bedroom wall and even my kitchen cabinet for a pop of autumn.
Rustic Farmhouse Pumpkin and Burlap Wreath: My Kids’ Favorite
This wreath is perfect for families because it’s sturdy, involves zero delicate flowers, and lets you go wild with pumpkins. Plus, my kids love “decorating” it (read: gluing pumpkins wherever they land).

Start with a burlap-wrapped wreath base. I buy plain burlap by the yard at Joann Fabrics and wrap it around the wire frame, securing it with floral tape. If you want that “distressed” look, lightly sand the edges or singe them with a lighter (do this outside, please,my first attempt set off the smoke alarm).
Now for the fun part: pumpkins. I mix real mini pumpkins (from Trader Joe’s) with faux ones (Dollar Tree has great options). Pro tip: If using real pumpkins, coat them in Mod Podge to slow down rotting. They’ll last about 3–4 weeks before turning mushy.
Fill in the gaps with:
- Eucalyptus (smells amazing and adds texture)
- Cotton stems (for a fluffy, “just picked” look)
- Fern fronds (dollar stores often sell these by the bunch)
- A big burlap bow (tie it loosely for that “I didn’t try too hard” vibe)
Last year, my son “helped” by gluing a pumpkin upside down. I left it. Imperfections make it real.
Natural Elements Wreath: Foraging Like a Pro (Even If You’re a City Slicker)
This is my zero-budget wreath. If you’ve got a backyard, a park, or even a neighbor with a nice oak tree, you can make this look expensive without spending a dime.
Here’s what I forage (or “borrow” from nature):
- Twigs and branches (look for ones with interesting shapes,curvy ones add movement)
- Acorns and seed pods (my kids and I go on “acorn hunts” in the fall,it’s like a treasure hunt)
- Dried leaves (maple, oak, or even colorful ones from a neighbor’s yard)
- Pinecones (the bigger, the better for texture)
- Weeds with seed heads (yes, weeds. Dandelion fluff and goldenrod look amazing in wreaths.)
To preserve them, I either:
- Let them air-dry in a brown paper bag for a week (works for leaves and small branches).
- Spray them with clear acrylic sealer (I use Mod Podge Outdoor) to keep them from getting soggy.
- Bake pinecones at 200°F for 1–2 hours to kill bugs (trust me, this is necessary).
Arrange everything on your wreath base, securing with hot glue. I like to cluster items in odd numbers (3 acorns, 5 pinecones) for a natural look. Add a jute ribbon for a finishing touch.
This wreath is perfect for a farmhouse-style coffee table or a mantel. And if it starts to look sad after a few weeks? Toss it in the compost bin,no guilt, because it was free!
Modern Minimalist Wreath: When You Want to Look Expensive (But Aren’t)
I’ll admit it: I have a love-hate relationship with minimalist design. On one hand, it looks sleek and sophisticated. On the other, it’s hard to pull off without looking like you tried too hard. But after a few attempts, I’ve cracked the code.
Here’s how to make a modern minimalist wreath that doesn’t scream “I watched 10 YouTube tutorials”:
Geometric Shapes: The Secret to Looking “Designed”
Skip the random foliage and go for clean lines and shapes. I used:
- Wooden slices (buy a bundle on Amazon or cut your own from a log)
- Metal accents (I found these at a thrift store for $2)
- Black-painted twigs (spray paint + a steady hand)
Arrange them in asymmetrical clusters,not evenly spaced. Think “art gallery” vibes, not “kindergarten craft.”
Monochromatic Color Schemes: Less Is More
Pick one color family and stick to it. Last year, I did all neutrals: beige, cream, and dark brown. This year? I’m trying deep green and black for a moody fall look.
Pro tip: If you’re using wood, distress the edges with sandpaper for a more natural look. I learned this from my furniture upcycling projects,it makes everything look intentional.
Materials That Scream “I Have Taste”
Mix textures for depth:
- Wood + metal (I used copper wire to wrap around twigs)
- Glass + ceramic (small votives or beads add a modern touch)
- Leather strips (check the craft store for faux leather)
Finish with a single ribbon in a neutral tone (no bows,this isn’t a kindergarten project). Hang it on a painted accent wall or your gallery wall for extra impact.
Dried Flowers and Herbs Wreath: Because It Should Smell Like Fall Too
This wreath is my secret weapon for making my house smell amazing. Dried flowers and herbs add fragrance, texture, and a touch of elegance. Plus, it’s a great way to use up herbs from your garden (or the sad basil plant you forgot to water).
Here’s how I dry my own flowers and herbs (no fancy equipment needed):
- Hang them upside down: Bundle stems with twine and hang in a dark, dry closet for 1–2 weeks. Lavender and rosemary dry beautifully this way.
- Silica gel: For flowers like roses or baby’s breath, bury them in a container of silica gel for 3–5 days. It preserves color and shape.
- Oven drying: Spread herbs on a baking sheet and bake at 200°F for 1–2 hours. I do this with thyme and oregano.
- Food dehydrator: If you have one, this is the fastest method. Set to 95°F for 2–4 hours.
For my wreath, I used:
- Dried lavender (smells like a spa)
- Rosemary sprigs (earthy and fresh)
- Baby’s breath (for fluffiness)
- Eucalyptus (because it’s basically nature’s air freshener)
Arrange them on a wooden or metal wreath base (I used a reclaimed wood ring from an old pallet). Secure with hot glue, then add a twine bow for a rustic touch.
Hang it near your entryway or kitchen so you get a whiff of fall every time you walk by. Pro tip: Spritz it with a little essential oil (lavender or cedar) to boost the scent.
Weather-Proofing Your Wreath: So It Doesn’t Turn Into a Sad, Soggy Mess
Nothing kills the autumn vibe faster than a wreath that falls apart after one rainstorm. I learned this the hard way when my first “outdoor” wreath turned into a pile of mush after a week. Now? I weatherproof everything.
Here’s my foolproof system:
Choose the Right Materials
Skip anything that’ll rot or rust:
- ✅ Faux flowers and pumpkins (no guilt,Dollar Tree is your friend)
- ✅ Dried natural elements (pinecones, twigs, seed pods)
- ✅ Metal or plastic accents (no wood that isn’t sealed)
- ❌ Real pumpkins or leaves (they’ll rot,save them for indoor wreaths)
- ❌ Unsealed wood (it’ll warp and crack)
Seal Everything
After assembling your wreath, give it a protective coat:
- Spray with clear acrylic sealer (I use Mod Podge Outdoor). Do this outside,it’s messy!
- For extra protection, add a clear varnish (like Minwax Polycrylic).
- If using a wire base, wrap it in waterproof floral tape first.
Hang It in the Right Spot
Not all doors are created equal. If your porch gets direct rain, hang the wreath under the roof overhang or on a covered stair. If you’re in a rainy climate, consider making an indoor wreath instead,it’ll last all season and save you the headache.
Last year, I hung a wreath on my wainscoted entryway wall and it stayed perfect for months. No weather damage, just cozy vibes.
Color Combinations That Actually Work (No “Fall Throw-Up” Here)
I’ll be honest: I used to go overboard with fall colors. Orange, red, yellow,all of it. And it looked like a Halloween store exploded on my door. Now? I keep it intentional. Here are the combos that work (and the ones to avoid).
Classic Fall: Warm and Inviting
This is your go-to for a cozy, traditional look:
- Deep orange + mustard yellow + burnt sienna
- Add texture with burlap, twine, and pinecones
- Metallic accents (gold or copper) elevate it instantly
Pro tip: If you’re using real leaves, stick to one type (like all maple or all oak) for a polished look. Mixing 10 different leaf shapes = chaos.
Muted and Moody: For the “Less Is More” Crowd
If bright colors aren’t your thing, try:
- Olive green + rust + cream
- Deep burgundy + slate gray + sage
- Add texture with dried pampas grass or dried citrus slices
This combo looks expensive and sophisticated,perfect if you want your wreath to look like it came from a boutique (but cost $20).
Monochromatic: When You Can’t Go Wrong
Pick one color and play with shades. Examples:
- All tones of brown (light tan + chocolate + espresso)
- Different greens (sage + forest + mint)
- Neutrals (beige + cream + taupe)
This is the easiest way to make a wreath look pulled together. Stick to 2–3 textures (like wood + metal + dried flowers) and you’re golden.
Unexpected Combos: For the Rule-Breakers
If you want to stand out, try these unexpected (but gorgeous) pairings:
- Black + white + pumpkin orange (modern and bold)
- Teal + gold + deep red (rich and unexpected)
- Blush pink + sage green + wood tones (soft and feminine)
I did the teal + gold + red combo last year, and it got so many compliments. People assumed I’d hired a designer. (I did not. I just Googled “unexpected fall colors” and winged it.)
Your Turn: Pick a Wreath and Run with It
Okay, let’s cut to the chase: Which wreath are you making first? Don’t overthink it. Grab your supplies, play some music, and get messy. The best wreaths aren’t perfect,they’re yours.
If you’re new to DIY, start with the classic foliage wreath or the pumpkin and burlap one. They’re forgiving and fun. If you’re feeling adventurous, try the modern minimalist design,it’s a great challenge.
And if you mess up? Good. My first wreath looked like a kindergartener made it. My second was better. My third? That’s the one hanging in my living room right now, and it’s my favorite.
Now go forth and make something you love. And if you do, tag me on Instagram @christinaprojects,I love seeing your creations!