
How I Gave My Fireplace a Fresh Look (Without Breaking the Bank)
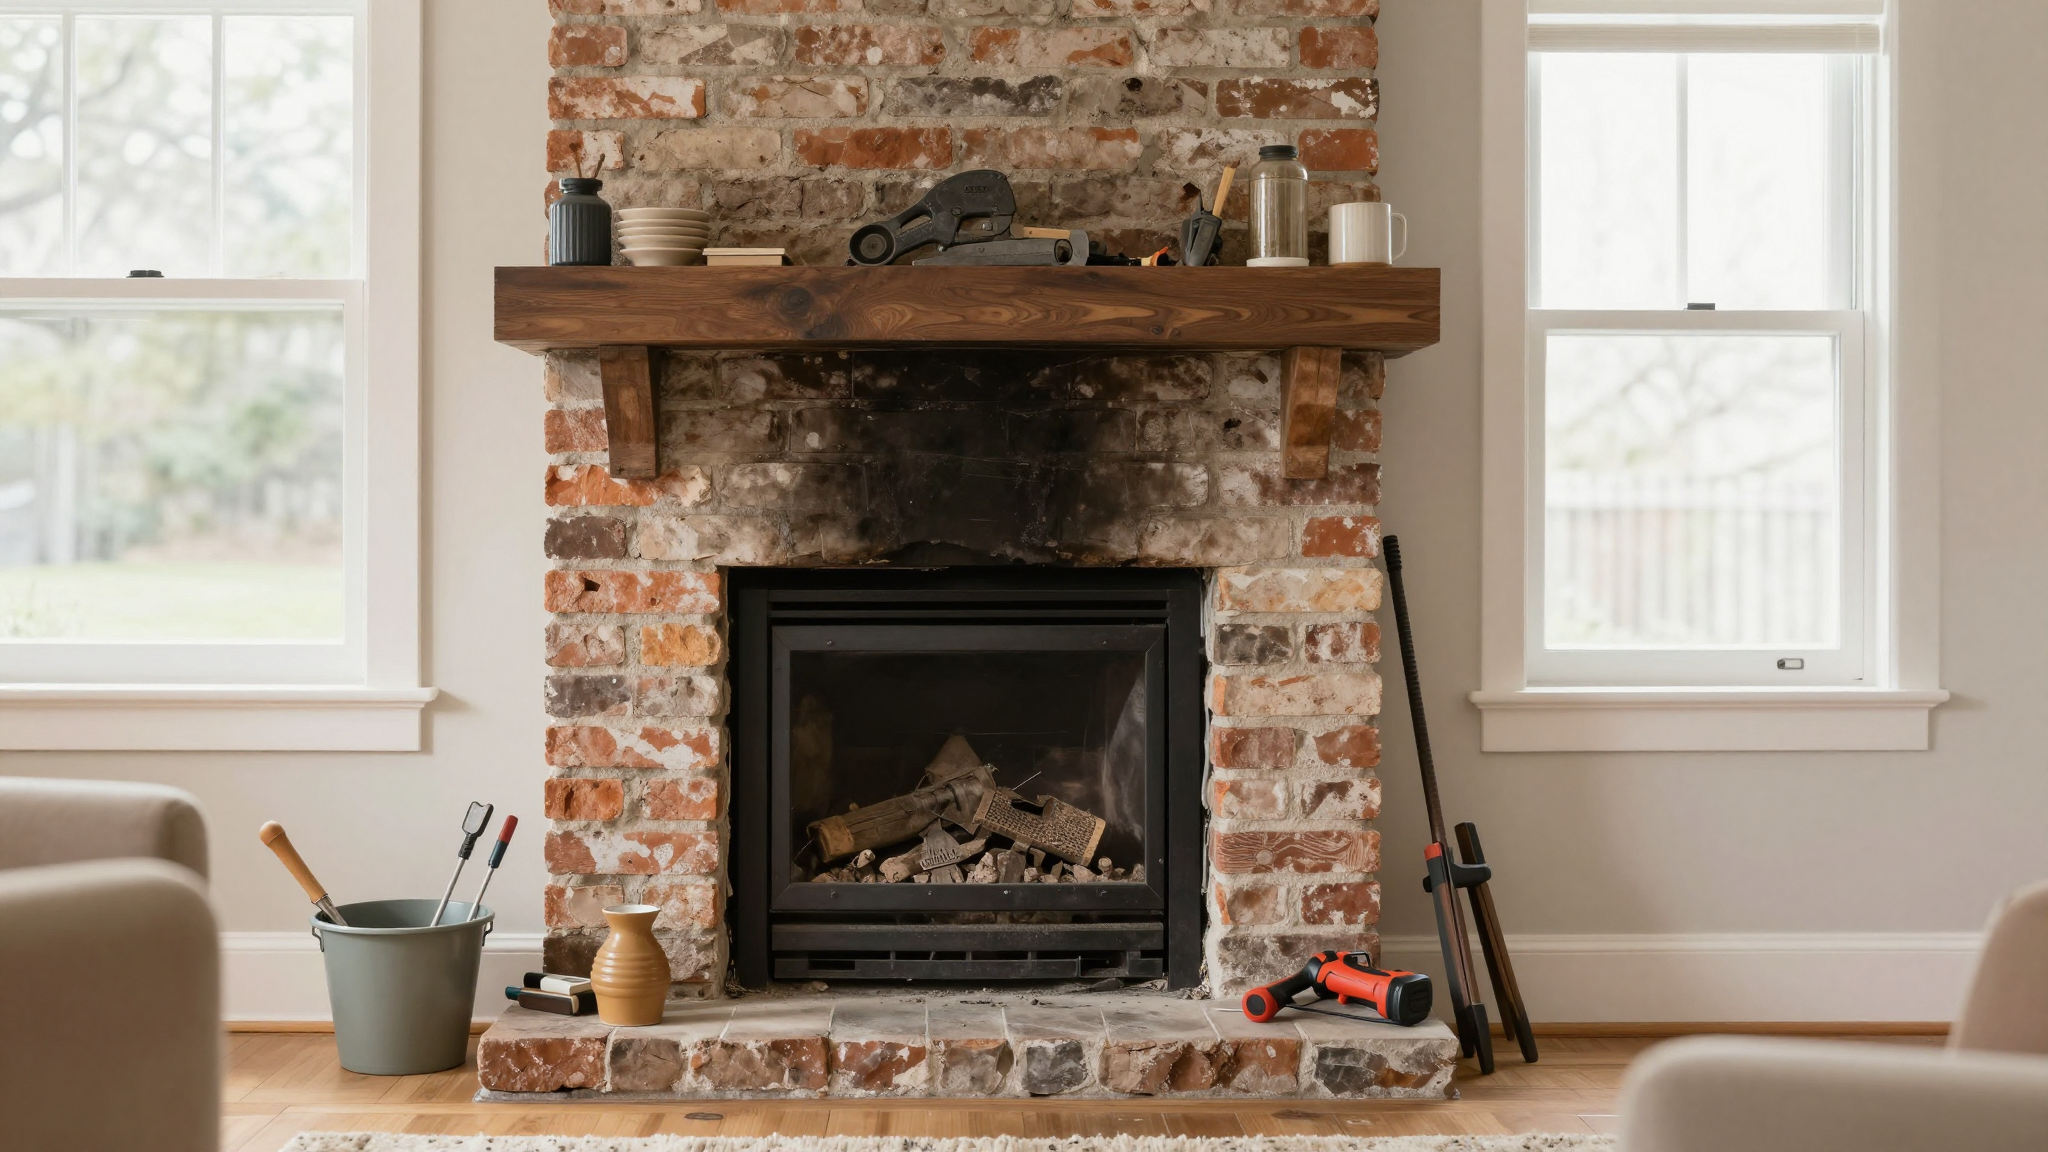
Let me tell you, my fireplace was a hot mess,literally. That old, soot-stained brick monstrosity had been an eyesore in my living room for years. Every time I walked in, it felt like a time capsule from the 1980s, clashing with the cozy, modern vibe I’d worked so hard to create. I knew I had to fix it, but I wasn’t about to drop thousands on a full renovation. So, I rolled up my sleeves, grabbed my essential tools, and got to work. Turns out, a little paint, some tile, and a whole lot of patience can work wonders.
The best part? This wasn’t some high-end designer trick,I did it all myself, even with two kids underfoot and a full-time job. And honestly? It was one of the most satisfying projects I’ve ever tackled. If I can do it, so can you.
Why This Project Was a Game-Changer (And Not Just for My Fireplace)
Before I even picked up a paintbrush, I stood in my living room, staring at that fireplace like it had personally offended me. It was dull, outdated, and,let’s be real,kind of depressing. The rest of the room had this bright, airy feel, but the fireplace? It was like a black hole sucking all the charm out of the space.
I’d been scrolling through Pinterest for home inspiration for months, dreaming of a cozy, inviting space where I could curl up with a book or host game nights with friends. But every time I looked at that fireplace, it felt like a roadblock. So, I decided to turn it into the focal point it was always meant to be,without spending a fortune.
I’ll admit, I was nervous. I’d never tackled a project this big before, and I was pretty sure I’d mess it up. But I reminded myself: mistakes can be fixed. And honestly? Some of my “oops” moments ended up being the best parts of the project. Like the time I accidentally sanded a little too aggressively and had to patch a hole in the drywall. (Pro tip: Check out my guide on patching drywall,it saved me from a full-blown meltdown.)
Here’s what I learned early on:
- Start small. Don’t try to overhaul everything at once. I began with a fresh coat of paint,just to see how it looked,and that alone made a huge difference.
- Embrace the “ugly phase.” Your project will look worse before it looks better. Mine did. A lot.
- Invest in quality tools, but don’t go crazy. My must-have tools,like a good level and a notched trowel,made this project 10 times easier.
If you’re thinking about updating your fireplace, trust me: it’s totally doable. And the best part? You don’t need to be a pro to make it look amazing.
My Step-by-Step Fireplace Makeover Journey
I’ll be honest,this project took longer than I expected. Between work, school drop-offs, and the never-ending laundry pile, I had to carve out time whenever I could. But I broke it down into manageable chunks, and before I knew it, my fireplace was unrecognizable.
Here’s how I did it:
Step 1: Inspiration (And a Lot of Pinterest Scrolling)
I spent hours on Pinterest and home decor blogs, saving images of fireplaces I loved. I wanted something modern but warm,nothing too stark or overly trendy. I kept coming back to two styles: a clean, white-painted surround with subway tile, and a more rustic look with reclaimed wood and stone. In the end, I went with the first option because it felt more timeless.
I also made a mood board in my Notes app (yes, I’m that person). It helped me visualize the final look and keep my ideas organized. If you’re feeling overwhelmed, I highly recommend doing this too,it’s a game-changer.
Step 2: Assessing the Damage (And Cleaning Up the Mess)
Before I could do anything, I had to assess the fireplace’s condition. I grabbed my work gloves, a scrub brush, and a vacuum, and got to work. The brick was crumbling in spots, the surround was covered in soot, and there were a few cracks I hadn’t noticed before.
I started by cleaning everything down with a mix of warm water and mild dish soap. (Yes, I know,it sounds weird, but it works!) Then, I used a wire brush to scrub off the worst of the grime. It was messy, but it made a huge difference. Once it was dry, I could see the real condition of the fireplace,and let me tell you, it was not pretty.
Here’s what I found:
- Chipped brick in a few spots (easy fix with patching compound).
- A loose section of the surround that needed to be reattached.
- Soot stains that had seeped into the grout (ugh).
I tackled the loose brick first, using a bit of construction adhesive to secure it. Then, I filled in the chips with patching compound and sanded it smooth. It wasn’t perfect, but it was a solid foundation for the rest of the project.
Step 3: Painting the Fireplace (And Learning Patience)
I’ll be honest,I was terrified of painting the fireplace. What if the color looked awful? What if the paint chipped? What if I made a huge mess? But I reminded myself: paint is cheap, and mistakes can be fixed.
I chose a high-quality, heat-resistant paint (I used Behr Premium Plus in “Ultra Pure White”) because I knew the fireplace would get hot. I also grabbed a good angled brush and a mini roller for the larger areas.
Here’s what I did:
- I thoroughly cleaned the surface again (dust and grime are paint’s worst enemies).
- I applied painter’s tape to the edges to keep things neat.
- I painted in thin layers, letting each coat dry completely before adding another. (This was the hardest part,waiting is not my strong suit.)
- I used a fine-grit sandpaper to smooth out any brush strokes between coats.
And you know what? It looked amazing. The white paint brightened up the whole room and made the fireplace feel fresh and modern. It wasn’t perfect,I had a few touch-up spots,but overall, I was thrilled.
Choosing the Right Materials (Without Breaking the Bank)
One of my biggest concerns was cost. I didn’t want to spend a fortune, but I also didn’t want to cut corners and end up with a fireplace that looked cheap. So, I did a lot of research and found some great budget-friendly options that still looked high-end.
Paint: The Easy (But Important) First Step
I knew I wanted to paint the fireplace white, but I wasn’t sure which paint to use. I ended up going with a heat-resistant, satin-finish paint because it’s durable and easy to clean. I also made sure it was mold- and mildew-resistant (because, let’s be real, fireplaces can get damp).
Pro tip: If you’re painting over dark colors, you might need a stain-blocking primer first. I used Benjamin Moore’s Stix Waterborne Primer, and it worked like a charm.
Tile: Adding Texture and Style
This was the part I was most excited about. I wanted to add tile to the fireplace surround to give it some texture and dimension. I considered a few options:
- Subway tile (classic, affordable, and easy to install).
- Marble-look tile (luxurious but pricier).
- Brick veneer (great for a rustic look, but I already had brick).
I ended up going with white subway tile because it was budget-friendly and fit the modern look I wanted. I found a great deal on a Home Depot sale,$3.99 per square foot!,and grabbed enough to cover the surround.
If you’re on a tight budget, peel-and-stick tile is another great option. It’s not as durable as real tile, but it’s a fantastic temporary fix if you’re testing out a look. (I actually used it in my guest bathroom first to see how I liked it.)
Mantel: The Finishing Touch
My fireplace had a wooden mantel, but it was old, stained, and so 1990s. I wanted to keep the same structure but give it a fresh, modern look. So, I decided to paint it the same white as the surround.
Here’s what I did:
- I stripped the old finish with a heat gun (wear a mask,it’s not fun to breathe in those fumes!).
- I sanded it smooth and wiped away all the dust.
- I applied a coat of shellac-based primer to seal the wood and block stains.
- I painted it with the same white paint as the surround, letting it dry completely between coats.
It looked incredible. The white mantel made the fireplace feel cohesive and modern, and it tied the whole look together.
DIY Tips and Tricks (From Someone Who’s Made the Mistakes)
If I’ve learned one thing from this project, it’s that patience is key. Rushing leads to mistakes, and mistakes lead to frustration. But if you take your time and follow these tips, you’ll end up with a fireplace you’ll love.

1. Use Joint Compound for a High-End Texture
I wanted my fireplace to have a little more dimension, so I experimented with joint compound to create a textured look. It’s cheap, easy to work with, and gives a custom feel.
Here’s how I did it:
- I mixed the joint compound according to the package instructions (it’s like mud, so wear gloves!).
- I spread a thin layer over the surface with a putty knife.
- I used the knife to create random textures,nothing too dramatic, just enough to add interest.
- I let it dry overnight, then painted over it with my white paint.
Pro tip: If you mess up, just sand it down and try again. Joint compound is forgiving!
2. Test Peel-and-Stick Wallpaper First
Before I committed to tile, I wanted to test a few looks. So, I used peel-and-stick wallpaper on a small section of the fireplace surround. It was a great way to play with colors and patterns without making a permanent change.
I used Tempaper (it’s removable and repositionable, so no stress!). I cut it to size, pressed it into place, and,boom,instant update. If I loved it, I could leave it. If not, I could peel it off and try something else.
This was a lifesaver because I changed my mind three times before settling on the tile.
3. Grout Like a Pro (Or at Least, Like a Beginner Who Doesn’t Mind Messing Up)
Grouting tile is not glamorous, but it’s necessary. I used a sanded grout in a color that matched my tile, and I applied it with a rubber float. It was messy, but I followed these steps to make it easier:
- I worked in small sections so the grout didn’t dry out too fast.
- I wiped away excess grout with a damp sponge immediately (this is the most important part!).
- I sealed the grout with a penetrating sealer to keep it looking fresh.
I’ll be honest,my first attempt was not pretty. The grout lines were uneven, and I had haze everywhere. But I cleaned it up, let it dry, and it turned out just fine. (And if yours doesn’t look perfect? No one will notice but you!)
Final Touches: Making It Feel Like Home
Once the tile was set and the paint was dry, it was time to add the finishing touches. This is where the magic happens,where a project becomes a home.
1. Glass Doors for a Modern Look
I added glass fireplace doors to give the fireplace a sleek, modern feel. They also help contain the heat (which is great for energy efficiency). I found a pair at Wayfair for under $200, and they were so easy to install.
Pro tip: If your fireplace isn’t level, the doors might not close properly. I had to shim the base with a few wooden spacers to get them to sit right.
2. Built-In Shelving for Storage and Style
I wanted to add a little extra storage and personality to the fireplace, so I built simple wooden shelves on either side. I used reclaimed wood to match the mantel, and I stained it to blend with the rest of the room.
Here’s how I did it:
- I measured the space and cut the wood to size.
- I attached L-brackets to the wall (I used a stud finder to make sure they were secure!).
- I stained the wood and let it dry.
- I screwed the shelves into the brackets and voila,instant storage!
Now I use the shelves to display books, candles, and little decor pieces that make the fireplace feel like part of the room.
3. Styling the Mantel Like a Pro
The mantel is where I really let my personality shine. I started with a large mirror (it reflects light and makes the room feel bigger) and then added a mix of candles, framed photos, and a few plants.
Here’s my formula for styling a mantel:
- Start with a statement piece (like a mirror or artwork).
- Add layers with smaller items (candles, books, decor).
- Mix in natural elements (like a small potted plant or a wooden tray).
- Keep it balanced,don’t overcrowd!
I also added a string of fairy lights behind the mirror for a cozy glow. It’s my favorite part of the whole fireplace!
Keeping My Fireplace Looking Fresh (Without the Stress)
Now that my fireplace is updated, I want to keep it looking its best. Here’s how I maintain it:
1. Regular Cleaning
I dust the mantel and shelves weekly (I use a microfiber cloth,it’s amazing how much dust collects!). For the tile, I wipe it down with a damp cloth and a little mild soap every few months. If the grout gets dirty, I scrub it with a grout brush and a mix of baking soda and water.
2. Protecting the Surface
I avoid placing hot objects (like candles or vases) directly on the mantel, and I use coasters under drinks. If I’m lighting a fire, I keep the glass doors closed to contain the soot.
3. Touch-Ups as Needed
If the paint starts to chip or the grout looks dull, I do a quick touch-up. I keep a small can of the same white paint and a bit of leftover grout on hand just in case.
Honestly? It’s not as much work as I thought it would be. A little maintenance goes a long way!
FAQs: Your Fireplace Makeover Questions, Answered
How can I update my fireplace without a full renovation?
You don’t need to tear everything out! Start with a fresh coat of paint (just make sure it’s heat-resistant). Then, add peel-and-stick tile or a new mantel. Even swapping out the hardware or adding glass doors can make a huge difference. Check out my 5 favorite DIY projects for more ideas!
What materials work best for a fireplace surround?
It depends on the look you want! For a modern vibe, I love subway tile or marble-look tile. If you want something rustic, try reclaimed wood or brick veneer. For a classic look, stone or stucco is perfect. Just make sure whatever you choose is heat-resistant!
How do I choose the right color for my fireplace?
Think about the rest of your room. If your space is light and airy, white or light gray paint will brighten it up. If you want warmth, try a soft beige or charcoal gray. Always test a paint sample on a small area first,lighting can change the way a color looks!
Can I really tile my fireplace myself?
Absolutely! Start with a clean, flat surface, use a notched trowel to spread the adhesive evenly, and follow the tile manufacturer’s instructions. If you’re nervous, try peel-and-stick tile first,it’s a great way to test a look before committing. (I’ve got a full guide on peel-and-stick tile if you need help!)
How can I make my fireplace the focal point of my room?
Start with a bold update, like tile or a painted surround. Then, add lighting (like a statement mirror or sconces) and layered decor (candles, plants, artwork). If your fireplace is dark or outdated, brightening it up will instantly draw the eye. For more ideas, check out my guide to DIY accent walls,some of those techniques work great on fireplaces!
What’s the best way to prep my mantel for painting?
First, sand off any glossy finish or rough spots. Then, wipe it down with a tack cloth to remove dust. If your mantel is wood, apply a shellac-based primer to seal it and block stains. This step is crucial,it’ll make your paint job last way longer!
How do I keep my fireplace looking good after the upgrade?
Dust it regularly (I do this every week). For tile, wipe it down with a damp microfiber cloth every few months. If you have a wood mantel, use a light wood polish to keep it looking fresh. And always close the glass doors when you light a fire to contain the soot!
Can I add shelving or glass doors to my fireplace?
Yes! Adding shelving is a great way to add storage and style. Just make sure you mount it securely (I used L-brackets and anchored them into studs). Glass doors are easy to install too,just measure your fireplace opening and find a pair that fits. They’ll make your fireplace look modern and cohesive!