
How I Installed My First Tile Backsplash (And What I Learned)
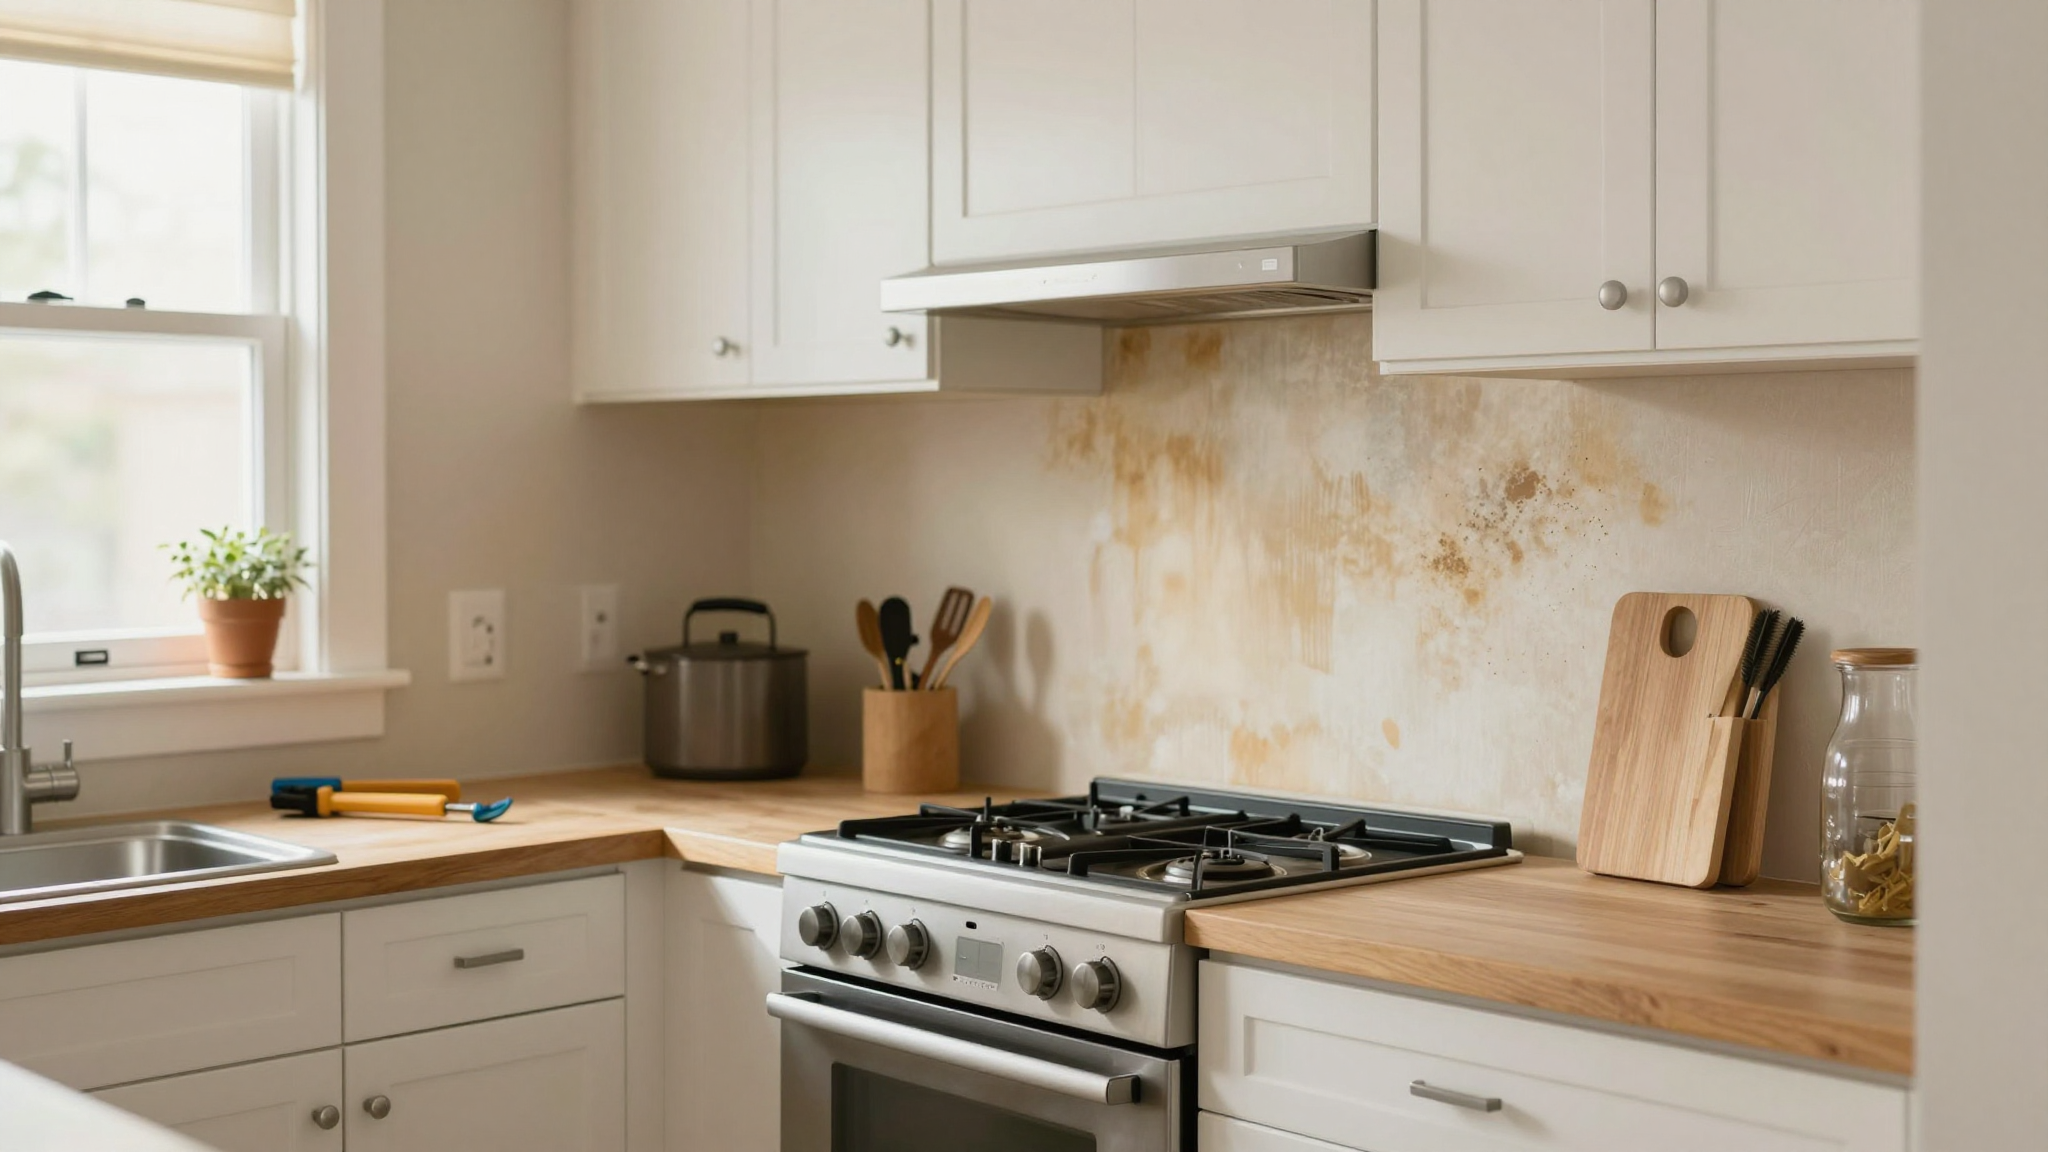
Let me tell you, my kitchen needed a refresh badly. The cabinets were fine, but the walls behind the stove? Ugly. Grease-stained, outdated, and just… sad. I kept picturing a sleek tile backsplash,something that would protect the wall while making the whole space feel modern. So, I rolled up my sleeves and decided to tackle it myself. No contractors, no “experts,” just me, a few tools, and a whole lot of patience.
Now, I’m not going to lie,this project had its moments. There were a few oops moments (like the time I cut a tile wrong and had to scramble to make it work), but in the end, it turned out so much better than I expected. If I can do it, so can you. Below, I’m walking you through exactly how I did it, step by step, including the mistakes I made so you can avoid them.
Before we dive in, here’s what you need to know:
- A tile backsplash isn’t just about looks,it’s a practical upgrade that protects your walls from splashes, grease, and everyday wear and tear.
- This project is totally doable for beginners, but it does require attention to detail. Rushing will show, trust me.
- I’ll cover all the tools you’ll need (and the ones I wish I’d had sooner).
- Planning ahead will save you time, money, and frustration. I learned that the hard way when I had to make a last-minute trip to the hardware store for a missing tool.
- Grout might seem like the easiest part, but it’s where a lot of people mess up. I’ll show you how to do it right so your backsplash looks polished, not sloppy.
If you’re ready to give your kitchen (or any room!) a fresh, functional upgrade, let’s get started. And if you’re feeling overwhelmed, don’t worry,I was too. But once you see how much difference a backsplash makes, you’ll be hooked. (Pro tip: Once you do one, you’ll want to tile your fireplace next. Trust me.)
Prepping Like a Pro (Or at Least, Like Someone Who Learned the Hard Way)
I’ll be honest,my first mistake was underestimating how much prep work this project would need. I thought I’d just slap some tiles on the wall and call it a day. Oh, how wrong I was. Proper prep is what separates a backsplash that looks like it was done by a pro from one that looks like a DIY disaster. Here’s what I did (and what I wish I’d done differently).
Measuring and Planning (Because Guessing Is a Bad Idea)
First, I grabbed my tape measure and measured the area behind my stove. I sketched out the space on paper, noting where the outlets were and how much room I had to work with. I even took a photo of the wall and drew on it with a dry-erase marker to visualize the layout. (Yes, I’m that nerdy.)
I made a big mistake here, though,I didn’t account for the fact that my wall wasn’t perfectly straight. If you’re working with an uneven wall (and let’s be real, most of us are), you’ll need to adjust your measurements. I ended up having to cut a few tiles at odd angles to make everything fit, which was frustrating but totally doable.
If you’re tiling a larger area, like a full kitchen backsplash, I highly recommend creating a dry layout on the floor first. This means arranging your tiles (without adhesive) to see how they’ll look and where cuts will need to be made. It saved me from having to redo anything later.
Oh, and one more thing,buy 10% extra tile. I thought I was being smart by calculating exactly how much I needed, but then I messed up a few cuts, and suddenly I was short. Don’t make my mistake!
Safety First (Because No One Wants a Trip to the ER)
Before I did anything, I turned off the power to the outlets behind the stove. I also removed the switch plates and outlet covers so I wouldn’t accidentally damage them. (I learned this the hard way when I nicked an outlet cover with my trowel. Oops.)
I cleared off my countertops and covered them with drop cloths to protect them from mortar and grout spills. I also taped plastic sheeting over my cabinets,yes, it looked silly, but it saved me from having to scrub dried mortar off the wood later.
Pro tip: If you’re working near outlets, consider using a voltage tester to double-check that the power is off. I borrowed one from my neighbor, and it gave me peace of mind.
Marking Your Reference Lines (The Secret to a Straight Backsplash)
This is where I really wish I’d taken more time. I used a pencil and a level to mark a straight line where the bottom of my backsplash would go. But here’s the thing,I was in a hurry, and I didn’t double-check my level. Big mistake.
By the time I realized my line was crooked, I’d already started applying mortar. I had to scrape it all off and start over. Lesson learned: Always check your level twice. And if you’re like me and tend to rush, set a timer and force yourself to slow down.
I also used a laser level (which I borrowed from my husband,thanks, hon!) to mark a perfectly straight line across the wall. If you don’t have one, a regular level will work, but you’ll need to check it more often as you go.
Oh, and one more thing,if you’re tiling above a countertop, make sure to account for the overhang. I measured from the top of the counter up to where I wanted the backsplash to end, then marked that line. It’s a small detail, but it makes a big difference in how polished your finished project looks.
Tools and Materials: What I Actually Used (And What I Wished I Had)
Before you start, you’ll need a few key tools. I’ll be honest,I didn’t have everything on this list when I started, and I had to make a few trips to the hardware store. Here’s what I actually used, plus a few things I wish I’d had from the beginning.
Tools You Need (No Skipping These!)
- Tile cutter or wet saw: I used a manual tile cutter for most of my cuts, but I wish I’d invested in a wet saw for the larger tiles. It makes cleaner cuts and is way easier to use. (If you’re doing a big project, splurge on this.)
- Notched trowel: I grabbed a ¼-inch notched trowel, which worked great for my small tiles. If you’re using larger tiles, you might need a ½-inch trowel.
- Level: I used a 24-inch level, which was perfect for checking my tiles as I went. Don’t skimp on this,cheap levels are inaccurate.
- Tile spacers: These little plastic crosses keep your tiles evenly spaced. I used 1/8-inch spacers, but you can find them in different sizes depending on your grout line preference.
- Grout float and sponge: For applying and smoothing grout, a grout float is a must. I also used a sponge for cleaning up excess grout.
- Safety gear: Gloves, safety glasses, and a dust mask are non-negotiable. Tile dust is no joke, and I learned that the hard way when I ended up with a coughing fit after cutting tiles without a mask.
- Bucket and mixing paddle: For mixing mortar and grout, a 5-gallon bucket and a drill with a mixing paddle make the job so much easier. (I mixed everything by hand at first and my arms were sore.)
Materials You’ll Need (And What I Wish I’d Bought More Of)
- Tile: I used subway tile because it’s classic and easy to work with. I bought 10% extra just in case, and I’m glad I did. (I ended up using the extras for a small fireplace project later.)
- Thin-set mortar: I used Laticrete 254 Plus, which is great for kitchen backsplashes because it’s water-resistant. Follow the instructions on the bag,mixing it wrong will make your tiles pop off later.
- Grout: I went with a sanded grout in a gray color to match my tiles. If you’re using larger tiles (over 6×6 inches), you’ll need unsanded grout instead.
- Grout sealer: This is essential. I used Miracle Seal 511, and it made a huge difference in keeping my grout looking clean. Don’t skip this step!
- Backer board (optional but recommended): If your wall is drywall, I highly recommend installing cement backer board first. It’s more expensive, but it’s worth it for durability. I skipped it on my first try and regretted it when a tile popped off a few months later. (I had to redo that section, and this time I used backer board.)
- Painter’s tape and drop cloths: For protecting your cabinets and countertops. I used FrogTape, which is great for edges and doesn’t leave residue.
Oh, and one more thing,if you’re tiling a large area, consider renting a tile saw from your local hardware store. It’s cheaper than buying one, and it’ll save you a ton of time (and frustration) on cuts.
Before you head to the store, check out my guide to essential DIY tools for more recommendations. And if you’re on a budget, don’t worry,you can make this project work with just the basics!
Measuring and Laying Out Your Tiles (Where I Almost Ruined Everything)
This is where I almost made a huge mistake. I was so excited to start tiling that I skipped the dry layout step. Big error. Here’s what I should’ve done (and what I did instead).

Measuring Your Wall (And Why You Should Double-Check)
First, I measured the height and width of the area I was tiling. I multiplied those numbers to get the square footage, then added 10% for cuts and mistakes. (I wish I’d added 15%,I still ran out of one tile and had to scramble to find a match.)
But here’s where I messed up,I didn’t account for the fact that my wall wasn’t perfectly straight. If your wall has bumps or dips, you’ll need to adjust your measurements. I ended up having to cut a few tiles at odd angles to make everything fit, which was frustrating but doable.
Pro tip: If you’re tiling a wall with outlets or switches, measure the distance from the floor to the outlet and mark it on your tile. This way, you’ll know exactly where to cut when you get to that spot.
Dry Layout: The Step I Skipped (And Regretted)
This is where I really wish I’d taken more time. A dry layout means arranging your tiles on the floor (or countertop) without adhesive to see how they’ll look and where cuts will need to be made. I skipped this step because I was impatient, and it cost me.
When I started tiling, I realized that some of my cuts weren’t going to work the way I thought. I had to rip off a few tiles and start over, which wasted mortar and made a mess. Don’t make my mistake,always do a dry layout!
Here’s how I did it the second time (and how you should do it):
- Lay out your tiles on the floor in the pattern you want. Start from the center and work your way out.
- Use spacers to keep the tiles evenly spaced.
- Mark any tiles that need to be cut with a pencil.
- Step back and look at the layout from a distance. Does it look balanced? Are the cuts going to work?
- Once you’re happy with the layout, take a photo for reference. This way, you’ll know exactly where each tile goes when you start applying mortar.
Oh, and one more thing,if you’re tiling a large area, consider using a laser level to mark a straight line across the wall. It’s a game-changer and makes tiling so much easier.
Prepping Your Wall (And Why Cleaning Is Non-Negotiable)
This is where I learned that prep work is everything. I thought I could just slap some mortar on the wall and call it a day. Wrong. If your wall isn’t clean and smooth, your tiles won’t stick. Period.
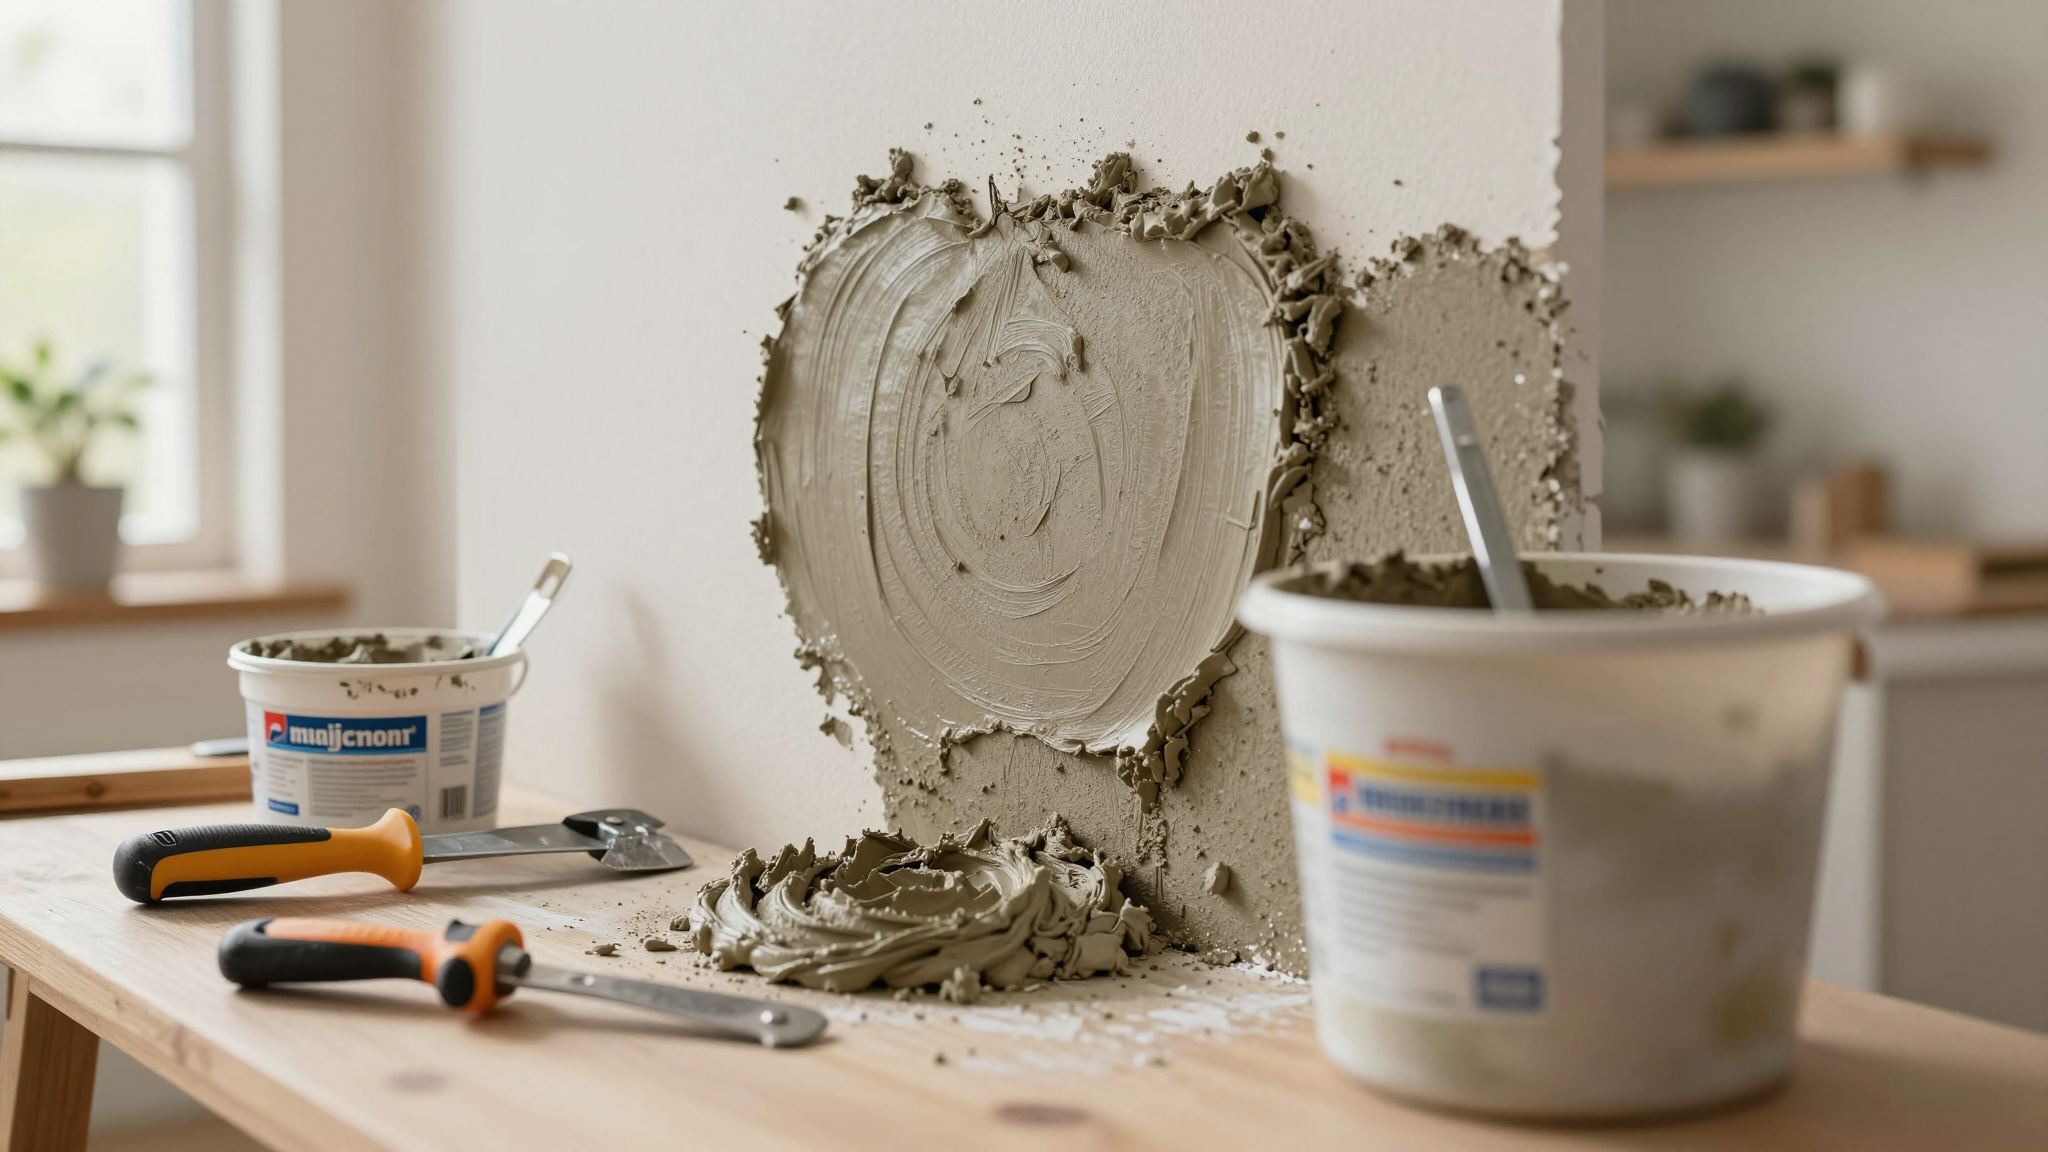
Cleaning and Repairing Your Wall (The Step I Almost Skipped)
First, I cleaned the wall with a TSP (trisodium phosphate) solution. This stuff is amazing,it cuts through grease, dirt, and old adhesive like nothing else. I used a sponge to scrub the wall, then rinsed it with clean water and let it dry completely.
Next, I checked for any holes, cracks, or imperfections. I filled them with spackle, let it dry, then sanded the area smooth. I used a 120-grit sandpaper for this, and I made sure to wipe away any dust with a damp cloth before applying mortar.
Here’s where I almost messed up,I didn’t prime the wall before tiling. If your wall is porous (like drywall), you should apply a bonding primer before applying mortar. It helps the adhesive stick better. I learned this the hard way when a few tiles popped off a few months later. (I had to redo that section, and this time I primed the wall first.)
Protecting Your Cabinets and Countertops (Because You Don’t Want to Scrub Mortar Off Later)
I covered my cabinets and countertops with drop cloths and secured them with painter’s tape. I also removed the outlet covers and switch plates to avoid damaging them. (I learned this the hard way when I nicked an outlet cover with my trowel. Oops.)
Pro tip: If you’re working near outlets, consider using a voltage tester to double-check that the power is off. I borrowed one from my neighbor, and it gave me peace of mind.
Oh, and one more thing,if you’re tiling a wall with a lot of outlets or switches, consider turning off the power to those circuits at your breaker. It’s an extra step, but it’s worth it for safety.
Cutting Tiles (Where I Made a Mess and Learned)
Cutting tiles is where I had the most oops moments. I thought it would be easy, but I quickly realized that precision is key. Here’s what I did (and what I wish I’d done differently).
Measuring and Marking for Cuts (And Why You Should Double-Check)
First, I measured the area where I needed to make cuts. I used a pencil and a metal ruler to mark the tiles, then double-checked my measurements before cutting. (I wish I’d triple-checked,more on that in a minute.)
For odd-shaped areas (like around outlets or corners), I used a dry layout to visualize how the cuts would work. This saved me from having to redo anything later.
Choosing the Right Tool for the Job (And Why I Wish I’d Upgraded Sooner)
I started with a manual tile cutter, which worked fine for straight cuts. But when I got to the outlets, I realized I needed something more precise. I ended up using tile nippers for small, curved cuts, but it was a pain.
If you’re doing a lot of cuts, I highly recommend investing in a wet saw. It makes clean, precise cuts and is way easier to use than a manual cutter. (I borrowed one from a friend, and it made the job so much faster.)
Safety note: Always wear safety glasses when cutting tiles. Tile dust is sharp and can fly into your eyes. Trust me, I learned this the hard way.
Handling Odd-Shaped Cuts (And Why I Wished I’d Practiced First)
Cutting tiles around outlets and switches was the hardest part. I had to measure carefully, mark the tile, and then cut it to fit. I messed up a few times and had to start over, which was frustrating.
Here’s a tip: If you’re nervous about cutting around an outlet, practice on a spare tile first. It’ll give you a feel for how the tool works and help you avoid mistakes.
Oh, and one more thing,if you’re cutting a tile and it breaks, don’t panic. You can often use the broken piece elsewhere (like for a small accent area or a different project). I ended up using my “mistake” pieces for a small stair makeover project later.
Mixing and Applying Mortar (Where I Almost Ruined Everything)
This is where I almost made a huge mistake. I mixed my mortar too thin, and it didn’t stick to the wall. I had to scrape it all off and start over. Here’s how I did it right the second time.
Mixing Mortar Like a Pro (And Why You Shouldn’t Rush)
First, I read the instructions on the mortar bag carefully. (Yes, I know,it sounds obvious, but I skipped this step the first time and mixed it wrong.) I used a 5-gallon bucket and a drill with a mixing paddle to mix the mortar.
I added the water slowly while mixing, until the mortar reached a consistency like peanut butter. If it’s too thin, it won’t stick. If it’s too thick, it’ll be hard to spread. I let the mortar sit for about 10 minutes, then mixed it again before using it.
Pro tip: If you’re mixing mortar in hot weather, add a little less water. The heat can cause the mortar to dry out faster, so you’ll need a thicker consistency.
Applying Mortar Like a Pro (And Why You Should Work in Small Sections)
I used a notched trowel to spread the mortar on the wall. I held the trowel at a 45-degree angle and scraped it across the wall to create ridges. These ridges help the tiles stick better.
I worked in small sections (about 3×3 feet) because mortar dries quickly. If you apply too much at once, it’ll dry out before you can set the tiles, and you’ll have to scrape it off and start over. (I learned this the hard way.)
Oh, and one more thing,if you’re tiling a large area, consider using a ledger board to support the first row of tiles. It keeps them straight and makes the job easier. I used a 1×2 pine board and it worked great.
Setting the Tiles (Where I Finally Got the Hang of It)
This is where I started to feel like I was getting the hang of things. Setting the tiles was way more satisfying than I expected, and I could see the project coming together. Here’s how I did it (and what I wish I’d known sooner).
Starting in the Right Place (And Why I Wished I’d Planned Better)
I started tiling from the bottom center of the wall and worked my way out. This is the most visible area, so I wanted to make sure it looked perfect. I used a level to check each tile as I went, adjusting as needed.
Here’s where I almost messed up,I didn’t account for the fact that my wall wasn’t perfectly straight. I had to adjust a few tiles to make them fit, which was frustrating but doable.
Pro tip: If you’re tiling a wall with a lot of outlets or switches, start from the center and work your way out. This way, you can cut tiles to fit around the outlets as you go.
Using Spacers for Even Gaps (And Why I Wished I’d Bought More)
I used tile spacers to keep the tiles evenly spaced. I placed one in each corner of the tile, then pressed the next tile into place. This created a consistent gap for the grout.
I wish I’d bought more spacers,I ran out halfway through and had to improvise with toothpicks. (It worked, but it wasn’t as precise.) If you’re doing a large project, buy extra spacers!
Oh, and one more thing,if you’re tiling a wall with a lot of curves or odd shapes, consider using a flexible spacer. It bends to fit around curves and makes the job easier.
Grouting and Sealing (Where I Finally Felt Like a Pro)
Grouting was the final step, and I was so ready to be done. But I knew this was where a lot of people mess up, so I took my time. Here’s how I did it (and what I wish I’d known sooner).
Mixing and Applying Grout (And Why You Shouldn’t Rush)
First, I mixed the grout according to the instructions on the bag. I used a grout float to apply it, holding the float at a 45-degree angle and pressing it into the joints. I worked in small sections, wiping away excess grout with a damp sponge as I went.
I let the grout dry for about 15 minutes, then went back and wiped the tiles with a clean, damp sponge. I repeated this process until the tiles were free of haze and the grout was smooth.
Pro tip: If you’re using sanded grout, wear a dust mask. The dust can be harmful if inhaled.
Sealing the Grout (And Why I Wish I’d Done This Sooner)
After the grout was completely dry (about 24 hours later), I applied a grout sealer. This is essential,it protects the grout from stains and moisture. I used a small brush to apply the sealer to each joint, making sure to cover it evenly.
I wish I’d sealed the grout sooner,I waited a few weeks, and by then, some of the grout had already stained. (I had to clean it with a vinegar solution, which worked, but it was a pain.) If you seal the grout right away, it’ll stay looking clean and fresh for years.
Oh, and one more thing,if you’re using a penetrating sealer, you’ll need to apply it multiple times. I used Miracle Seal 511, and it required two coats. Follow the instructions on the label!
Final Thoughts (And What I’d Do Differently Next Time)
Looking back, I’m so glad I tackled this project. My kitchen looks so much better, and I’m proud of how it turned out. But if I could do it all over again, here’s what I’d change:
- I’d spend more time planning. I rushed the layout and ended up with a few awkward cuts. Next time, I’ll take my time and make sure everything is perfect before I start.
- I’d invest in better tools. A wet saw and a laser level would’ve made the job so much easier. (I borrowed them from friends, but next time, I’m buying my own.)
- I’d prime the wall first. This would’ve helped the mortar stick better and saved me from having to redo a section later.
- I’d buy extra tile. I thought I was being smart by calculating exactly how much I needed, but I ended up short and had to scramble to find a match.
- I’d seal the grout sooner. I waited too long, and some of the grout stained. Next time, I’ll seal it right away.
But overall, I’m so happy with how it turned out. My kitchen feels fresh and modern, and I love how the backsplash ties everything together. Plus, I learned a ton of skills that I’ll use on future projects.
If you’re thinking about tackling a backsplash project, go for it! It’s a lot of work, but the results are worth it. And if you’re feeling overwhelmed, just remember,even if you make mistakes (like I did), you can always fix them. The key is to take your time, follow the steps, and don’t be afraid to ask for help if you need it.
Now, if you’ll excuse me, I’m off to plan my next project,a fireplace makeover. Wish me luck!
FAQs
What tools do I need for a DIY tile project?
You’ll need a tile cutter or wet saw, notched trowel, level, tile spacers, grout float, sponge, safety glasses, and a bucket with a mixing paddle. If you’re doing a large project, consider renting a wet saw for cleaner cuts.
How do I measure the wall for a backsplash?
Measure the height and width of the area you’re tiling, then multiply those numbers to get the square footage. Add 10% extra for cuts and mistakes. If your wall isn’t straight, measure it in sections and adjust your layout accordingly.
Should I protect my countertops and cabinets during installation?
Absolutely! Cover them with drop cloths and secure them with painter’s tape. This will protect them from mortar and grout spills. I also removed the outlet covers and switch plates to avoid damaging them.
What is the process for cutting tiles around outlets and switches?
Mark the tile according to the outlet’s position, measure carefully, and cut using a tile cutter or wet saw. Double-check your measurements before cutting to avoid mistakes. If you’re nervous, practice on a spare tile first.
What technique should I use to apply mortar?
Mix the mortar to a consistency like peanut butter, then use a notched trowel to spread it on the wall. Hold the trowel at a 45-degree angle to create ridges for better adhesion. Work in small sections to avoid the mortar drying out.
What is the method to check if my tiles are level?
Use a level to check each tile as you go. Start by marking a straight reference line on the wall, then use the level to check the tiles against that line. Adjust as needed before the mortar sets.
What is the correct time to apply grout?
Wait until the tiles are fully set (usually 24 hours), then mix the grout and apply it with a grout float. Wipe away excess grout with a damp sponge after 15 minutes, then repeat until the tiles are clean and the grout is smooth.
Is sealing my grout necessary?
Yes! Sealing the grout protects it from stains and moisture. Apply a grout sealer after the grout is fully dry (usually 24 hours). Follow the manufacturer’s instructions for the best results.
How do I clean the haze on the tiles after grouting?
Wipe the tiles gently with a clean, damp sponge. Avoid soaking the grout lines, as this can weaken them. Repeat until the haze is gone and the tiles are clean.
Is it feasible to install a backsplash over an existing one?
It’s possible, but I don’t recommend it. Removing the old backsplash first will give you a smoother surface to work with and ensure a better bond for your new tiles. If you do tile over an existing backsplash, make sure it’s clean, dry, and in good condition.